Create user
An account gives a person access to the DocSecBox. You create the account, and the DocSecBox sends the person a mail for setting their password.
Create an account
- Open Settings › Overview › Users and click Create user. The Create user dialog opens.
- Choose the account's Language.
- Enter Name, E-mail-Address and Username (Login). These three fields are mandatory.
- Under Global permissions, decide what the account may do. For each permission, click (allow) or (withhold).
- Expand Groups and select the groups the account should belong to.
- Click Save user.
The DocSecBox reports “User saved!” and sends the mail for setting the password. If that mail could not be sent, the account exists all the same. Send the mail again through Manage account › Reset password.
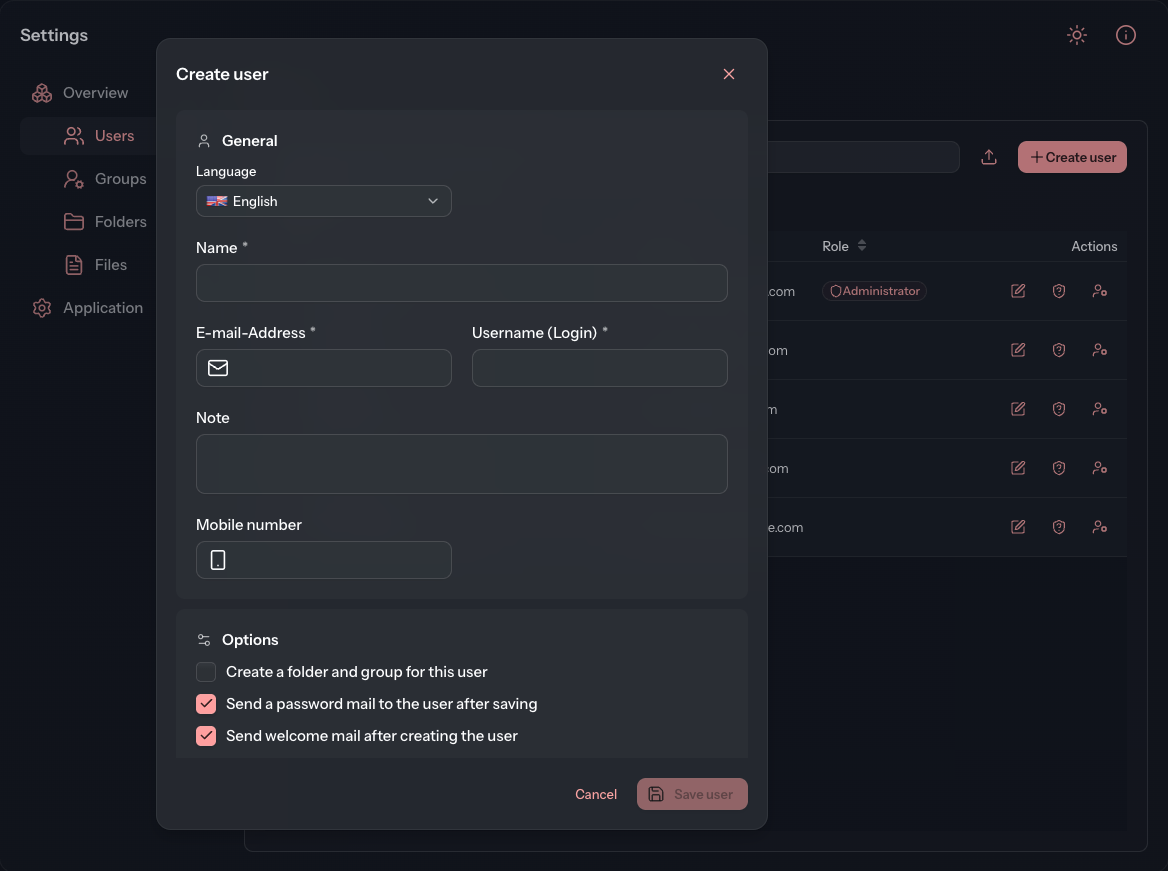
Fields at a glance
General
| Field | Meaning |
|---|---|
| Language | The language of the interface and of the mails for this account. The person can change it later in their profile. |
| Name | First and last name. |
| E-mail-Address | The DocSecBox sends its mails to this address. |
| Username (Login) | The name used to sign in. Leave the field empty and click into it, and it takes over the e-mail address. |
| Note | Free text for you. The search field of the user list also finds the note. |
| Mobile number | For text messages, such as the emergency alarm. See below. |
The Mobile number has to be a valid mobile number; the dialog does not accept landline numbers.
A number without a country code is read as a German number. It is stored in international format,
so 0170 1234567 becomes +491701234567. If an entry is invalid, the dialog does not save and
reports “Please check the input fields!”.
Options
This card exists only when creating an account.
| Field | Meaning |
|---|---|
| Create a folder and group for this user | Creates a group and a folder of its own for the new account. Below it you choose whether both are named after the Name or the Username (Login). Whether the box is preselected is set under Objects. |
| Send a password mail to the user after saving | Preselected. Sends the person a mail with a link for setting their password. |
| Send welcome mail after creating the user | Preselected. Also sends the welcome mail. It carries no access link, so it can only be chosen together with the password mail. |
Access & status
| Field | Meaning |
|---|---|
| Deactivate user | The account cannot sign in. See Deactivate an account. |
| Force 2-Factor-Authentication | The account has to set up two-factor authentication when signing in. |
| Superadmin | Makes the account a superadmin. Only a superadmin can select this checkbox; for everyone else it is greyed out. |
Global permissions
Here you decide what the account may do in the folders it reaches. Each permission has two buttons: allows it, withholds it. When you create an account, neither is chosen at first. A permission you do not allow is not granted.
| Permission | Meaning |
|---|---|
| PDF-Viewer | Open and read files. |
| Download | Download files. |
| Upload | Upload files. |
| Edit own files | Edit files the person uploaded. |
| Edit other files | Edit all files, including other people's. |
| Delete own files | Delete files the person uploaded. |
| Delete others files | Delete all files, including other people's. |
| File log | Open a file's history. |
| Send notifications | Notify others about a file. |
| Create/edit folders for assigned groups | Create folders and change their settings. |
| Management | Makes the account an administrator with access to the settings. |
These permissions apply in every folder of the account. For a single folder you can create an exception. The permission system explains how, and what the permissions are called elsewhere. Whether Send notifications is preselected for new accounts is set under Objects.
Groups
The groups decide which folders the account sees. The card starts collapsed, and its heading counts the selection: Groups (0 selected). Expand it, search with Search for group... if needed, and select the groups. Without a group, the account sees no folder at first.
Login info
Enable login popup for user shows the person a message after signing in, once per session. It reveals:
- Login info text: the text of the message, with simple formatting.
- Login info logo: a picture above the text. Click Choose files to upload one (2 MB at most). Remove logo takes it out again.
- Preview: shows the message as the person will see it.
The person can open the notice again later from the help menu. If you switch the popup off again, text and logo stay stored.
See also
- Import users, to create many accounts at once
- Edit user
- Permission system