On this page you set up the mail server the DocSecBox sends its mail through. You also edit the four texts it sends automatically, and you can check which mails have gone out.
Administrators only
Only administrators see this page. If Only super administrators are allowed to adjust program settings is switched on under Roles, only super administrators see it.
Set up the mail server
You get the credentials from whoever operates your mail server.
- Open Settings › Application › E-mail.
- Fill in the fields of the SMTP-Server card (see the table).
- Click Save settings.
- Click Send testmail. The DocSecBox sends a test mail to your own address.
The top right corner of the card shows whether everything needed is filled in: Ready to send or Incomplete. Send testmail always tests the saved settings. While you have unsaved changes, the button is greyed out.
| Field | Meaning |
|---|---|
| Hostname and port | Address of the mail server, with the Port next to it. |
| Sender address | The address the DocSecBox sends its mails from. |
| SSL/TLS, STARTTLS | Type of encryption. The two can be switched on independently. |
| Authentication | Anonymous (no sign-in) or Username and password. The Username and Password fields only appear with the second choice. |
Delivery options
| Field | Meaning |
|---|---|
| max recipients per mail | Splits a notification into several mails after this number of recipients, so that it is not taken for spam. 0 turns splitting off. |
View sent mails
In the History card, click Mail log. The Mail history dialog shows every mail sent on the Sent tab and every failed one on the Not sent tab. The columns give the Point of time, Trigger, Type and Subject, and for failed mails the Error message as well. Use the Search by subject, trigger or address… field to find individual mails.
Edit the mail texts
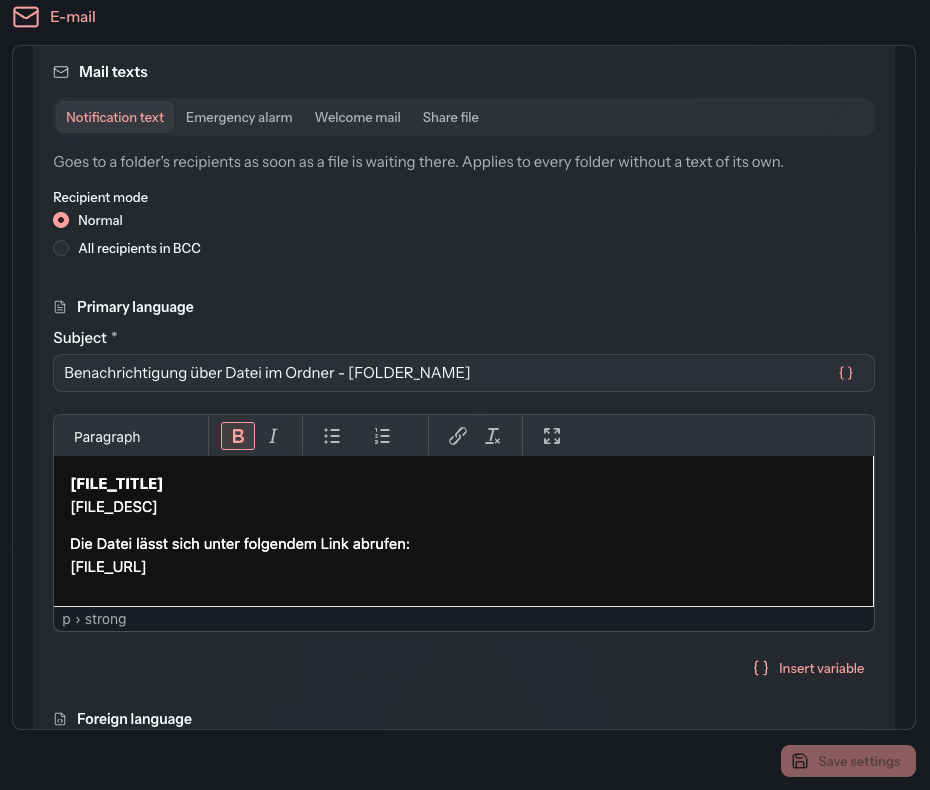
- In the Mail texts card, select the tab of the text.
- Change the Subject and the text, under both Primary language and Foreign language.
- Click Save settings.
You set which language is the primary one under Interface. Insert variable inserts
a placeholder such as [FOLDER_NAME]. When sending, the DocSecBox replaces it with the matching
value. The list only offers the placeholders that work in this text.
| Tab | When the mail is sent | Own text per folder |
|---|---|---|
| Notification text | As soon as a file is waiting in a folder for its recipients. | yes |
| Emergency alarm | As soon as a file is uploaded into an emergency folder. The mail goes out in addition to the emergency text message. | yes |
| Welcome mail | When a new account is created and Send welcome mail after creating the user is selected. | no |
| Share file | When a file is shared. The mail carries the link; the access code arrives separately by text message. | no |
For Notification text and Emergency alarm, subject and text are mandatory fields.
Recipients of the notification
On the Notification text tab, use Recipient mode to set how recipients are addressed:
| Option | Meaning |
|---|---|
| Normal | The recipients appear visibly in the mail. |
| All recipients in BCC | No recipient sees the others. In the Visible recipient in BCC field, enter the address that appears as the recipient instead. |
Folders with their own text
A folder can use a text of its own instead of the text on this page.
- Notification text: Folders with their own text lists the folders that differ. Use View to read a folder's text. It can only be changed in the folder itself, on the Notify tab under Texts.
- Emergency alarm: Under Folders with their own alarm text you maintain the differing texts right here. Click Add a folder, choose the Folder, write the Alarm text and click Save template. Use Edit and Delete in the row to change or remove a text.
These changes to folder texts take effect at once, without Save settings. The welcome mail and the Share file mail always apply to the whole tenant.
Own text is lost
If you remove a folder's own text (Remove or Delete), the folder uses the text on this page again. The folder's previous wording is then deleted.